Salesforce Obscura: Update a field when you upload a file (with Flows!)
One more way to use Screen Flows to manage Files while tracking exactly which files have been uploaded
In our last article, I showed you how to grab an uploaded image file from an Experience Cloud page and copy it into a Rich Text field. This article is a slightly more practical variation (and a bit easier to implement too!).
Our clients are all nonprofits, and a large percentage of them need to track and report on whether their participants have provided certain files. Our clients make requirements reportable and track them in Salesforce in one of 3 different ways:
- Creating and completing a Task for each requirement.
- Creating custom fields so they can check a box (please don’t*) or enter a date (MUCH better!) to indicate the completion of each requirement.
- Adding a record to a custom child object for each requirement.
Each of these approaches is great for reporting, list views, and generally keeping track of a lot of people with a lot of files to track.
(* Why not use a checkbox? They’re everybody’s favorite field! As an architect and data person I hate them because an empty box can equally mean “not yet captured” and “I forgot to check the box”; also checkboxes can’t give you any history or sense of when they were checked. Is this stale data? Recent? Who knows, it’s a mystery! I like dates for requirements, but a picklist that lets you distinguish between “not provided” and “I forgot” works well in the right setting too.)
But every file-based requirement means that first you have to use the File uploader, and then you have to navigate to wherever else you’re keeping track of that information and update that data too. It doesn’t sound like a lot, but our clients deal with thousands of people a year so every click saved compounds into a really big deal.
Good thing we can solve it with Screen Flows!
Example Use Case and Solution Overview
Our example nonprofit needs to track whether its applicants have submitted a resume, two essays and a photo. The applicant can’t be evaluated for entry into the program without all of these items completed.
Applicant data is tracked on a custom Application object, because people can apply to the program once time each year. We’ve set up 4 date fields — one for each requirement — and a formula to let us know when they’re all done.
We’re going to create a screen flow that captures and attaches the file upload to the Applicant record while also setting the date based on the type of file uploaded.
Solution Overview:
- Prepare the Application record with your requirements fields
- Create a Screen Flow and set up its Resources
(2a) New Resource: AppRecordID
(2b) New Resource: UploadedCVIds - Create the file upload screen
(3a) Create the Screen element
(3b) Add the picklist component
(3c) Add the file upload component - Process the uploaded file and update the Application record
(4a) Decision: Do we proceed? If so, what type of file was uploaded?
(4b) Update Record: Update Application
(4c) Save and Activate your Flow - Embed the Screen Flow into the Lightning Record page
(5a) Drag the Flow onto the Lightning Record Page
(5b) Configure the Flow Component
There are so many variations on this solution. You could find and complete a Task based on the file type. You could set up an uploader that accepts all 4 files at once. You could replace the dates with URLs so that the record links right to the file preview (that seems…redundant since that’s what Files does, but hey, you live your dreams). My goal is to prompt some “could we make this easier” thinking and show how to address some interactions with Files and Flows.
(Step 1) Create requirements fields on your object.
- I added 4 Date fields — one for each requirement — on my Application object. Your details will obviously differ from mine.
- I also added a formula field that shows me when all requirements are met, for easy filtering in list views.

The formula from these returns a checkbox, and is structured like this:
IF(AND(NOT(ISBLANK(Date_Essay_1_Received__c)),
NOT(ISBLANK(Date_Essay_2_Received__c)),
NOT(ISBLANK(Date_Photo_Received__c)),
NOT(ISBLANK(Date_Resume_Received__c))
),
TRUE,
FALSE
)

(Step 2) Create a new Screen Flow and Set Up Resources
The overview of my Screen Flow is below. Because this is being integrated into an internal Lightning Record page, I’m not doing the “do we have all of our data” checks that we did in the last solution. If you want nicer error messages, you certainly can do that check first.
This part of the documentation focuses on the Screen Flow setup. Step 3 shows setting up the file capture itself, and Step 4 shows the processing logic.

You will need two Resources to make this work, outlined in detail below. Create all new Resources in the Toolbox, under “Manager,” by clicking “New Resource.”
(2a) New Resource: AppRecordID
Explanation: to construct this solution, you have to know which Application record you want to attach the new file to and, for this example, which record contains the field/s you will update. In the Lightning Record Page you can pass the ID of the Application into a Flow variable. So you are setting up this variable to anticipate embedding it into your record page.

Create your Application Record ID variable and ensure it is Available for Input so that it can be embedded properly
- Resource Type: Variable
- API Name: AppRecordID
- Description: This variable contains the ID of the Application Record that embeds this flow
- Data Type: Text
- Make sure to check the box next to Available for Input
(2b) New Resource: UploadedCDIDs
Explanation: the file uploader available in Screen Flows will return the IDs of the uploaded files (content documents) and content versions, but always as a list (collection). So you are creating a collection variable to contain the results, even though you are only going to allow a single file to be uploaded in the flow.

Create a collection variable to contain the Content Document IDs returned from the file uploader
- Resource Type: Variable
- API Name: UploadedCDIDs
- Description: This collection contains the record set required by the file uploader to get the Content Version IDs back
- Data Type: Text
- Check the box next to “Allow multiple values (collection)”
(Step 3) Create the File Upload Screen
Now that you have the prep work done, you can start building your screen flow. This is a very simple screen that captures the type of requirement this file satisfies, and the File Uploader itself.
(3a) Create the Screen element
Explanation: In Screen Flows, a Screen is the way you interact with a user (rather than the data processing elements like Decision or Assignment). We need to create the screen that requests both the file itself and asks the user to identify which requirement the upload is satisfying.

- Click + to start your Flow, and choose “Screen”
- Screen Properties: Label: Upload Requirement Document
- Screen Properties: Description: Upload a document to satisfy a program requirement.
- Configure Header: Check “Show Header” and (optional) Show Help Text.
- Configure Footer: Check “Show Footer”.
- Configure Footer: Next or Finish Button: Use a Custom Label (“Save File”)
- Configure Footer: Previous Button: Hide Previous
- Configure Footer: Pause Button: Hide Pause
(3b) Add the picklist component
Explanation: We want to present a required field on our screen, asking which requirement this upload satisfies. For this example we have chosen a picklist because our use case requires a one-to-one relationship between a file upload and a requirement. If one file upload satisfies multiple requirements for you, you can change this as needed.

- Under “Components” on the left-hand side, find “Picklist” and drag it into the center panel.
- Label: Requirement Satisfied by this Document
- Check the box next to “Require”
- Configure Choices: Let Users Select Multiple Options: No
- Component Type: Picklist
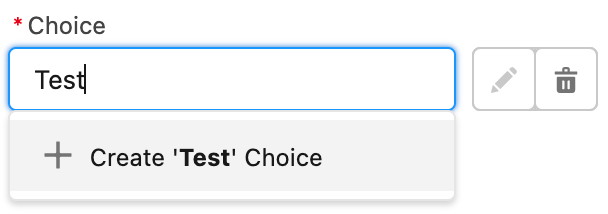
- Choice: Enter the first choice of your picklist and click “+ Create [choicename] Choice” to save it as an option. Do this until all choices are set.
(3c) Add the file upload component
Explanation: This component allows you to capture the file upload from the end user and let Salesforce do all the heavy lifting of putting it where it needs to be. In this step there are a few setup items that are necessary to ensure the file is linked correctly to its parent record and gives us back enough information for the next step.

Under “Components” on the left-hand side, find “File Upload” and drag it into the center panel.
- API Name: UploadDocument
- File Upload Label: Upload Document
- Accepted Formats: leave this blank unless your requirements are of a specific file type (e.g. .pdf)
Note: you can just type in a comma-separated list of accepted formats - Allow Multiple Files: False
Note: click into this field and type false. It will set the field to {!$GlobalConstant.False} - Content Document IDs: LEAVE THIS BLANK
- Content Version IDs: LEAVE THIS BLANK
- Disabled: leave this blank
- Hover Text: leave this blank or put some sort of help text in if you prefer
- Related Record ID: {!AppRecordID}
Find the AppRecordID resource you set up in step 2a. - Uploaded File Names: leave this blank
- Optional: Set Component Visibility: I have left this to “Always”
IMPORTANT: Expand the Advanced dialogue box
- Check the box for “Manually Assign Variables”
- Leave everything else blank except for Content Document IDs
- Content Document IDs: {!UploadedCDIDs}
Find the UploadedCDIDs collection resource you created in step 2b. - Revisited Screen Values: Check next to “Refresh inputs to incorporate changes elsewhere in the flow”

The Advanced options for File Upload are the same as the standard ones, but you must set the Content Version IDs here instead of in the standard settings for this example to work.
(Step 4) Process the uploaded file and update the Application record
This next step of the Flow will process the uploaded file so that we know which requirement date to set.
(4a) Decision: Do we proceed? If so, what type of file was uploaded?Explanation: After the user clicks “Save File,” Salesforce will automatically do what it needs to do to put the file on the parent object, but we need to just double-check to make sure that happened correctly. And we need to know which requirement field to update, which is why we’ll take advantage of the multiple Outcomes in a Decision action.
Immediately after your screen, add a Decision to determine not only what kind of file was uploaded, but also if we even have a file at all. That’s just a simple best practice to double check before proceeding that nothing went wrong.

- Click + to under your screen and choose “Decision”
- Label: What Type of File
- Description: What type of file was uploaded?
Outcomes 1:
- Label: Photo Uploaded
- Condition Requirements to Execute Outcome: All Conditions are Met (AND)
- Set up the first condition: Requirements_Satisfied_by_this_Document [Equals] Photo
In this condition, we are asking if the picklist on the File Upload screen was set to our first choice, which for this example is Photo. - Set up the second condition: UploadedCDIDs [Is Null] False
In this condition, we are asking if the file uploaded successfully. Under Resource, choose the UploadedCDIDs resource you set up in step 2b.
Outcomes 2–4: repeat the same steps for Outcomes 1, one for each requirement picklist value you created when setting up your screen flow.
(4b) Update Record: Update Application
Explanation: The whole purpose of uploading a document and choosing the requirement it fulfills is to be able to set the correct piece of data on the Application record. This is the step where we make all of that happen by using the decision we set in the step above to determine which field on the Application record to set.
Under each of your decision branches, you will add an “Update Record” action to update the relevant requirement date field on the Application that started the flow.

- Click + to under your first decision branch (ours is called “Photo” to indicate a photo was uploaded) and choose “Update Record”
- Label: Update Application with Photo
- Description: Update the Photo Requirement date
- How to Find Records to Update and Set Their Values: Specify conditions to identify records, and set fields individually
- Object: Application
Choose the object that started your flow. Ours is called Application. - Condition Requirements to Update Record: All Conditions are Met (AND)
- Condition: ID [equals] AppRecordID
Find the AppRecordID resource you set up in step 2a. - Set Field Values for the Application Records: Field: Date_Photo_Received__c
Choose whichever requirement field corresponds to the upload of the first picklist item. For us, if the file uploaded is a Photo, then we update the Date Photo Received field on Application. - Set Field Values for the Application Records: Value: $Flow->Current Date
In this field, look for $Flow from the list of options. Click on it and choose Current Date.


Copy and paste this element into each of your decision branches, making sure to update the Field to reflect whichever requirement you are on.
(4c) Save and Activate your Flow
Now is a really good time to pause and celebrate making it this far.
(Step 5) Embed Your Flow into a Lighting Record Page
The last step is to allow your users to access and launch your flow. We wanted to embed this right above the File list on the Application page, so that’s what this example shows.
(5a) Setup->Object Manager->Application->Lightning Record Pages and drag the Flow component onto the screen
Explanation: this Screen Flow was designed to be embedded directly into your record page so that it’s super easy for your users. This step just connects the dots between the Flow you just built and the record itself.

(5b) Configure the Flow Component
Explanation: This step links the Flow you created above to the record page. It uses the Input variable you set up in step 2a. Remember when you checked the “Available for Input” box on the AppRecordID resource? that’s what allows the Flow Component to pass the Record ID in to your Screen Flow.

- Click on the component to open up its contextual configuration window.
- Flow: Upload Requirements Document
or whatever you named the flow you created in steps 2–4 - Check the box next to “Pass record ID into this variable” under the “AppRecordID” variable.
- Save and publish.
(Step 6) Test it out
Go to your record and upload a file. You should see your requirement automatically captured and the file linked to the record.
Congratulations! Have fun with your new expertise!
My firm (Deep Why Design) specializes in weird use cases and things nobody else wants to touch — from big and innovative shared platforms and custom solutions to teaching accidental admins how to get the most out of their systems. My areas of expertise are fire jumping and forensics — call when there’s an unsolvable problem — and the design and management of large, integrated, and complex data systems in highly constrained situations.
