Salesforce Obscura: Nonprofit Data Pipeline On the Cheap (Part 3): Azure Resources

For this part of the work, you will need to be able to create Azure resources. While this article is fairly long, it incorporates all of the foundational Azure-related components so we thought it best to keep it in one article.
This article will take you through:
- Creating an Azure account (if you don’t have one)
- Creating a subscription for this work
- Creating a resource group for your database and automation account
- Creating an Azure SQL Server that is sufficient for non-real-time warehouse processing
- Allowing your IP to connect through the firewall
- Testing your connection with Azure Data Studio
- Setting up the schema and permissions for the sync
We’ll tackle the automation account in the 5th article of this series, since you may not need it to accomplish your goals.
You need to be very, very careful with each of these steps as Azure uses a utilization-based pricing structure and a mistake in setup can easily cost a lot more than you were expecting. For any full evaluation of your setup you should talk to a Microsoft expert, which I definitely am not.
Proceed at your own risk. This works for me and my clients, it may all end in tears for you. If any part of this doesn’t work for you, I can’t help you troubleshoot it, sorry. This is provided purely for informational purposes so proceed with caution!
The people who usually do this work are spread across a few different disciplines. Setting up an Azure account and maybe even the database and firewalling would most often be your IT team who are going to be focused on infrastructure access, security, and cost. Creating the schema and users would fall to a database administrator, which is typically a completely different skillset than the IT team as it requires knowledge of SQL and an understanding of how databases are put together.
Step 1: Set up an Azure account if you don’t have one
You can start for free and if you work for a nonprofit, make sure you connect with an account exec to explore your grant options. You may be able to access some of these resources at lower cost.
Step 2: Create a Subscription if you don’t have one

A subscription is sort of a cost container — it’s linked to a billing account (so you’ll need to create one of those if you don’t have one, though you were probably walked through that step when creating your new Azure account) and all of the things you’ll build out in this tutorial will be linked to the same Subscription.
I have never filled in the Advanced or Tag sections here — but I’m not a Microsoft expert. So maybe I’m missing something, but it hasn’t hurt me yet.

Step 3: Create a Resource Group if you don’t have one
A resource group is a container within your subscription. Microsoft experts can explain it better than I can, but for this tutorial just know that you need one.
Find the Resource Group icon and click + to add one.

Choose the Subscription you created in step 2, and give your Resource Group a name. I have just named it the same thing as my Subscription for this demo.

Step 4: Create a SQL Database Server
Click the big + sign to create a resource, then choose “SQL Database.”
Page 1: Basics
Link it to the subscription and resource group you created in steps 2 and 3.
Give your database a name.
You will be asked for the server — you should create this from this screen (image below).

- Click “Add New”, give your server a name and choose how you will authenticate to this server.
- I have frequently implemented these in settings that do not have Azure AD, so feel free to choose “Use SQL Authentication” if you also don’t use Azure AD. Just set a strong password and please do not choose “admin” as your username.
- When you click “OK” you will be returned to the previous page to continue creating a SQL Server database, with your new server linked in the correct space.
Choose NO for “Want to use SQL elastic pool?”
By Compute+Storage, click “Configure database”. You will be taken to a new screen to configure (image below).

- Under “Service Tier” look for DTU-Based, then choose “Standard” and take the defaults
- Your Estimated Cost per Month should be very low, like under $25/mo low.
- NOTE: You are choosing a less responsive, going-to-be-throttled storage because you don’t need anything else. You’re not doing real-time, responsive work from this system, but rather, you’re storing a bunch of mostly static data and some views, and using it to fuel your data visualizations.
- Click “Apply” to return to the Database setup screen
Choose whichever backup and redundancy setting is appropriate for you.
When you’re finished, your screen should look similar to the below and your estimated monthly cost should be quite low.

Page 2: Networking
By default, the database is firewalled off from the universe. We typically explicitly allow only specific IP addresses while we’re building and working with data until we are able to work with a technologist who can apply other types of Azure-based access controls. If that isn’t available, we stick with IP-based restrictions and just manage any changes manually.
On this page, we are going to leave the defaults as they are. Ultimately we will set up a private endpoint for the runbooks to use, so if you’re comfortable doing that go ahead here. Otherwise just leave the defaults.

Page 3: Security and Page 4: Additional Settings
We typically take the defaults here, but you should consider which of these settings make sense for your environment. They’re not covered here.
Page 5: Review and Create
On this page, make sure you click “Create” in the bottom left of the screen or you will not actually create your database!
You will need to wait until your deployment is complete to attempt to connect, so now is a good time to download Azure Data Studio if you don’t already have it.
Step 5: Allow your IP to Connect
Once your SQL Server has deployed, you will get a screen letting you know, and a button to let you navigate to the resource. Click “Go to Resource.”

You will be taken to your new SQL Server. Look for a row of tabs that includes “Set Server Firewall” and click on it.

On the Public Access tab, change the option from “Disable” to “Selected networks.”

CLICK SAVE BEFORE PROCEEDING! Otherwise you will get an error.
Under “Firewall rules” you should see a + with ‘Add your client IPV4 address” — click this to add your IP. Then click “Save.”
Step 6: Confirm that You Can Connect
We use the free Azure Data Studio to connect directly to the SQL Server database and perform basic tasks, like security setup.
Launch Azure Data Studio
Create a Connection — in my Azure Data Studio, it’s a convenient button on my home screen. If you don’t see that, it’s also visible in the Connections menu in the left nav.

- Connection Type: Microsoft SQL Server
- Connect with Parameters
- Server: the server you created at the beginning of step 4 when you created the SQL Database Server. It should be something very similar to [yourservername].database.windows.net
- Authentication Type: SQL Login (unless you chose a different structure in step 4)
- Username and Password: the ones you set up in step 4 when you created the SQL Database Server.
- It’s up to your organization’s policies whether you remember the password or aren’t allowed to do so.
- Database: click the dropdown to select your database. Azure Data Studio will use the credentials you entered to attempt to connect to your database server, so you may see “Loading…” for a bit. If it doesn’t find your database, go back into portal.azure.com and verify your firewall entry.
- Encrypt: Mandatory (True)
- Trust Server Certificate: False
- Server Group: <Default>
- Name: Give this a name so you know from your connections list what you’re connecting to in the future.
- Click connect.

Step 7: Set up a schema and user for your Salesforce sync
There are many different approaches and philosophies that guide how you might want to design your warehouse. We use a very simple approach that is intended to work well with Skyvia’s replication packages and allows you to replicate multiple Salesforce orgs into the same database without any trouble.
We create a separate schema for each source database. In this series, we’re only connecting a single source (Salesforce), but in reality you likely wouldn’t go through all of this setup without wanting to connect multiple sources.
We also create a separate user for each schema.
For all of this work, you will be executing SQL commands in Azure Data Studio. There are, apparently, different ways of doing this but I find this clear and it allows me to store the scripts that I used so I can easily rebuild if needed. After many years with technology, I always save my scripts.
To open up a SQL compose window, just right-click on the connection (which will bring up a contextual menu) and choose “New Query.”
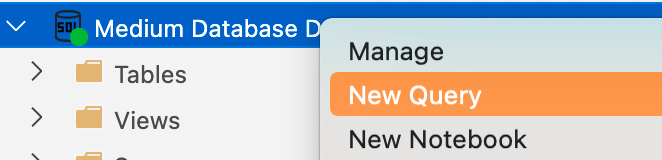
Query 1: Create the schema
The commands to do this work are quite simple but it can be confusing to know exactly what to do, in exactly which steps, so we’re listing them here.
In your query editor, type in the following. Then click Run.
create SCHEMA SF;
GO

Very shortly after you hit run, a Messages pane should open below your SQL compose window and it should say
“Commands completed successfully.
Total execution time: ….”
Once you get the “Commands completed successfully” you can move to the next step.
Explainer: a schema is a collection of tables that can operate semi-independently in a database. It’s helpful to have different schema for different data sources for a number of reasons that are beyond the scope of this article to cover.
Query 2: Create the database users
You will need to change the connection to ‘master’ before you take the next step!

In your query editor, type in the following. CHANGE ReplaceWithYourPwd! You are setting a password for this user, so generate a strong password, put it in a safe place, and only leave it in this script long enough to run it. Don’t store this script with your actual password in plain text!!
CREATE LOGIN SFSchemaUsr WITH password=’ReplaceWithYourPwd’;
GO
CREATE USER SFSchemaUsr FOR LOGIN SFSchemaUsr WITH DEFAULT_SCHEMA=[SF];
GO
Then click Run.
Explainer: you are creating a new user and password in the first statement. This is the username and password you will put into Skyvia when you create the database connection (article 4 will go through these steps) and you can also use this username and password in Azure Data Studio to connect and create queries. Yes, it’s called “login” and yes, it’s distinct from “user” but that’s just the way these systems are set up.
The second query creates the user that is linked to the login and assigns that user the default schema that you set up in query 1.
Query 3: Create the schema users with the right permissions
You will need to change the connection back to your database before you take the next step!

Take note: this step links the login you created above with rights to modify your database. I have granted a somewhat extensive set of permissions to this user for this schema because your Skyvia replication needs to be able to create tables and perform all data operations in those tables. You will want to understand what each of these permissions does and assess whether the permissions are right for your use case.
CREATE USER SFSchemaUsr FOR LOGIN SFSchemaUsr WITH DEFAULT_SCHEMA=[SF]
EXEC sp_addrolemember ‘db_datareader’, ‘SFSchemaUsr’;
GOEXEC sp_addrolemember ‘db_datawriter’, ‘SFSchemaUsr’;
GOGRANT EXECUTE, ALTER, INSERT, REFERENCES, DELETE ON SCHEMA :: SF TO SFSchemaUsr;
GOgrant CREATE TABLE to SFSchemaUsr;
GO
Explainer: The first query makes the user yet again, but this time in the target database (rather than the master database). And yes, it’s linking it again to the schema, because you have to specify these things at each step. The remaining queries are granting permissions required for this new user to operate within its schema within this database so that Skyvia has the correct permissions to replicate your Salesforce data.
Summary:
For every data source you want to connect to this warehouse, you would create a new and different schema (query 1), then create new and different logins and users in the master database (query 2), then create and assign the right permissions to those new and different logins and users in the target database (query 3).
For example, if you want to bring in your ADP data, you would repeat queries 1–3, but replacing “SF” with “ADP” so that you have:
create SCHEMA ADP;
and in query 2
CREATE LOGIN ADPSchemaUsr WITH password=’ReplaceWithYourPwd’;
GO
CREATE USER ADPSchemaUsr FOR LOGIN ADPSchemaUsr WITH DEFAULT_SCHEMA=[ADP];
and so on.
Step 8: Take a deep breath!
You got through the hard part. The rest of it is easy from here on out. Congrats!
What’s in this series?
You should read these in the order listed below.
- Overview — introduces the series and outlines our example use case
- Salesforce and the data visualization ecosystem — this article, which explores the more conceptual aspects of data and reporting
- Setting up SQLServer as a Data Warehouse — the steps to set up SQLServer in an Azure environment to meet the requirements of being “good enough” for this use case
- Setting up SkyVia to replicate your Salesforce data into SQLServer — the steps to use SkyVia to pull data from Salesforce into SQLServer on a regular basis
- Transforming data inside your SQLServer for visualization — the overview of why you’d have data in SQLServer in the first place, what your automation options are, and how you might use this thinking to support visualizations
FAIR WARNING: YOU GET WHAT YOU PAY FOR WHENEVER DATA IS CONCERNED. Analysis on the cheap is going to be bad analysis and the more powerful the toolkits the more that can go wrong. I am focusing only on building an affordable data pipeline and storage solution, which are things that are likely in reach for a sufficiently technical Salesforce administrator.
If you read this series and feel despair at executing on this stuff yourself, reach out. We at Deep Why focus on making your Salesforce ecosystem work really well, which can include getting it into an Azure data warehouse. Our friends at Inciter specialize in helping you understand your data and making all of your reporting needs seamless and easy. We often work together, so if you’re not sure just shout and we’ll get you to the right team.