Salesforce Obscura: Auto-copy a File to a Rich Text Field with FormAssembly
Option 1 of 2 — using FormAssembly to upload the file

We often have clients who want photos uploaded to Salesforce and put directly into a rich text field. You know of course that you can just drop a photo from your computer into a rich text field, and you may know that you can attach a file, open it in preview, copy it, and paste it into a rich text field (this is browser dependent).
But what if you need to capture, say, a student’s photo on their Contact record? What if the student is responsible for uploading that photo as part of onboarding?
Here’s a simple step-by-step to getting that done. You can upload the file however you want, of course, but FormAssembly is our go-to for all things forms-and-Salesforce.
Example Use Case and Solution Overview
For this article, we tackle a very common request from our clients: getting an external party (say, a student applicant to a youth program) to upload their own photo and displaying that photo in a rich text field for internal users to view and use.
Solution Overview:
- Prepare the Contact record with a Rich Text field to display the photo and a field to trigger the Flow
- Create a Flow that responds to a change on Contact to populate the Rich Text Field
(2a) Create a new flow on Contact
(2b) New Resource->Variable: TypeOfFile
(2c) New Resource->Formula: DocumentURL
Getting the URL for the Image tag
(2d) Decision: Photo ID Is Not Blank
(2e) Get Records on the “Yes” path from the decision: Find CV Data
(2f) Update Record: Update Photo
(2g) Save and Activate Your Flow - Create the FormAssembly form to capture the file upload
- Create the FormAssembly connector to store the information in Salesforce
(4a) Create new ContentVersion Record
(4b) Update the Contact Record to store the ContentVersion ID
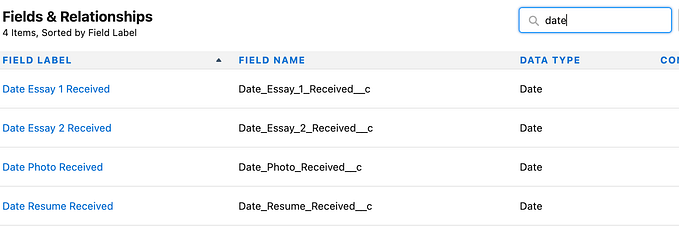
(Step 1) Create 2 new fields on your object.
- A text field, 18 characters long, to contain the ID of the file you will upload. I called mine “Photo CV ID”
- A rich text field to display the photo itself. I called mine “Photo” and just took the defaults for a rich text field.

(Step 2) Create a Flow to respond to your ID field and populate your Photo field
My flow is simple, for demonstration purposes. It starts by asking if the Photo CV ID is not null but the Photo field is. If that’s the case, it goes off to find the file type from the Content Version (using the ID in the Photo CV ID field) and then updates the Photo field with a formula that brings it all together.

(2a) Create a new flow on Contact
Or modify an existing one. Please note this tutorial assumes you are familiar with creating and editing flows and will not go into great detail on how to create, edit, save or debug them, sorry! If you’re less familiar with Flows, you may want to take a look at the companion piece to this article that goes more in depth on each of the steps in building a flow.
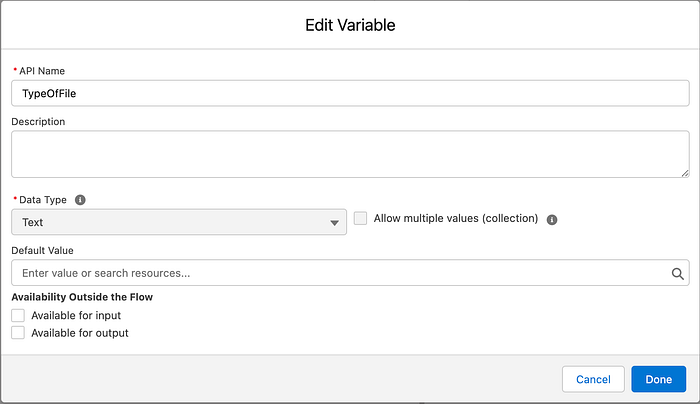
(2b) New Resource->Variable: TypeOfFile
Create a new Variable. It should contain Text, and I have called mine TypeOfFile.
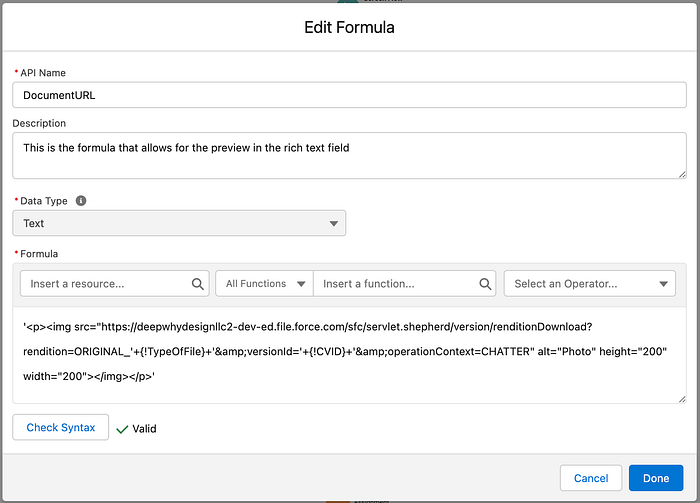
(2c) New Resource->Formula: DocumentURL
This is where you construct the actual text to go into your Rich Text field. It is an HTML image tag that references the content version ID and the type of file (variable you created above).
The formula is of type Text and should be similar to the below. I have called my formula DocumentURL.
IMPORTANT NOTES:
- If you just copy/paste the formula below, make sure you adjust {!$Record.Photo_CV_ID__c} to match your actual custom field name
- Replace REPLACEME below with your actual domain. From any record page, just grab the part of the URL before “.lightning.force.com”

‘<p><img src=”https://REPLACEME.file.force.com/sfc/servlet.shepherd/version/renditionDownload?rendition=ORIGINAL_'+{!TypeOfFile}+'&versionId='+{!$Record.Photo_CV_ID__c}+'&operationContext=CHATTER" alt=”Photo” height=”200" width=”200"></img></p>’
IMPORTANT: Getting the URL for the Image tag
The URLs for Salesforce resources change periodically. In fact, between publishing this article for the first time and the update it changed from documentforce.com to file.force.com.
You may find that this formula works great for awhile and then suddenly stops working, in which case I’d immediately look to the URLs.
To get the URL currently in use for the photo previews, I:
- Manually upload an image file to a Contact record
- Click on the file to open it in the File Preview. Right click (command+click on mac) and copy the preview to my clipboard.
- Paste from my clipboard into a Rich Text field on Contact and save my changes.
- Use dataloader.io to export only the record I’m testing with, and only my rich text field. The html for the working, pasted image will show up in plain text in the export, allowing you to mimic it in this formula field.
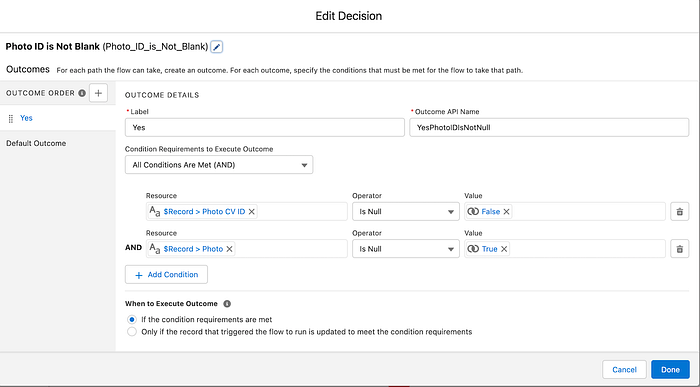
(2d) Decision: Photo ID Is Not Blank
Add a new Decision to start your flow. I have called mine Photo ID Is Not Blank. If the record’s Photo CV ID field is not empty but the Photo field is empty, we return a “Yes” decision, which is what tells us we need to take the next step.
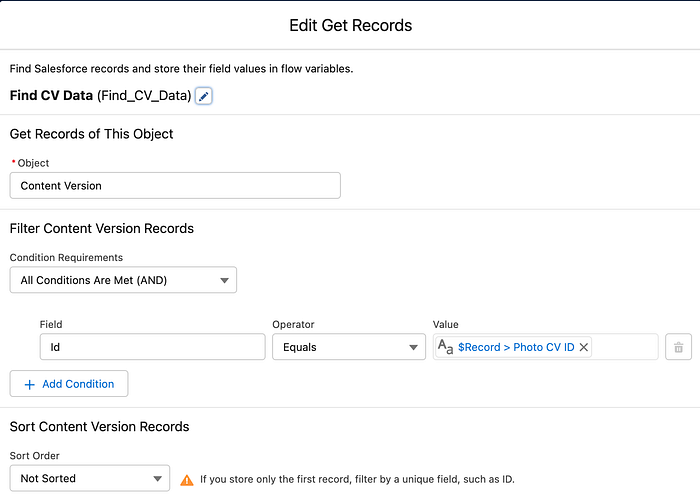
(2e) Get Records on the “Yes” path from the decision: Find CV Data
Add new Get Records action to the flow on the “Yes” path out of the decsion created above. I have called mine Find CV Data. The purpose of this is to step is to use the ID of the Content Version record to obtain the type of file so that its preview displays properly. The field FileType on the Content Version record will be stored in the variable we created in step 2b.
- Get Records of this Object: Content Version
- Filter Content Version Records: Where ID equals $Record->Photo CV ID
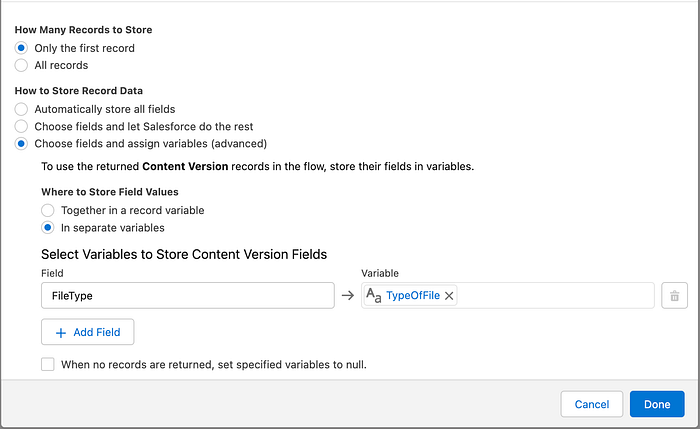
- How many records to store: Only the first record
- How to store record data: Choose fields and assign variables (advanced)
- Where to store field values: In separate variables
- Set your variable to store the value FileType in your variable TypeOfFile
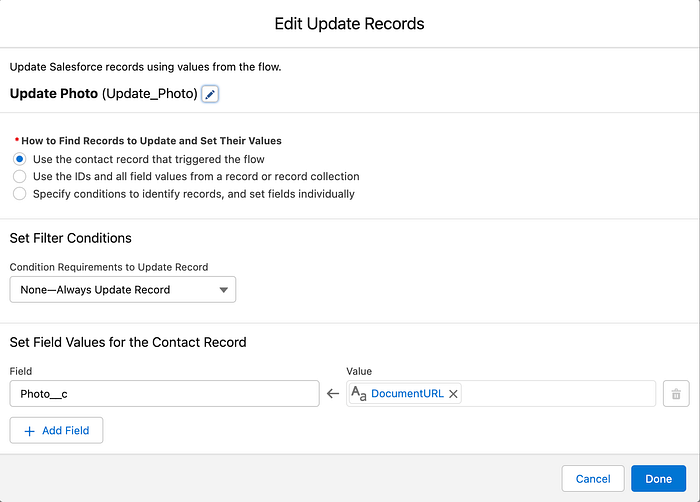
(2f) Update Record: Update Photo
- Use the record that created the flow
- Set Filter Conditions: None — Always Update The Record
- Set Field Values For the Record: Set your rich text field equal to the formula field you created in (2c)
(2g) Save and Activate Your Flow
At this point you may want to test the flow by manually putting an ID of a file into the the Photo CV ID field, but you have to make sure to get the Content Version ID (not any of the other IDs that come along for the ride with Files).
(Step 3) Create your FormAssembly Form
For this example we have a very simple form that has a file uploader and a hidden Contact ID field. We would prefill the Contact ID field with the Contact ID from Salesforce but you can also put enough information to look up the Contact. As with Flows, this tutorial isn’t really able to go too far into exactly how to set up a FormAssembly form — the goal is just to ensure you can attach a File to the right Contact and get the ContentVersion ID.

(Step 4) Create your FormAssembly Connector
Connect your FormAssembly form to Salesforce with an After Form Submitted connector. You will first create the file upload, then use the ID from the uploaded file to fill in your Contact field.
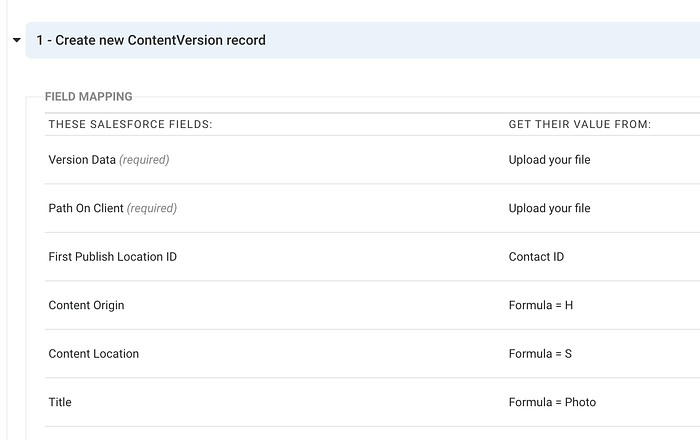
(4a) Create new ContentVersion Record
Use the FormAssembly step-by-step instructions on uploading a file to save your file to Salesforce. Your hidden Contact ID field will be used to find the record to attach the file to.
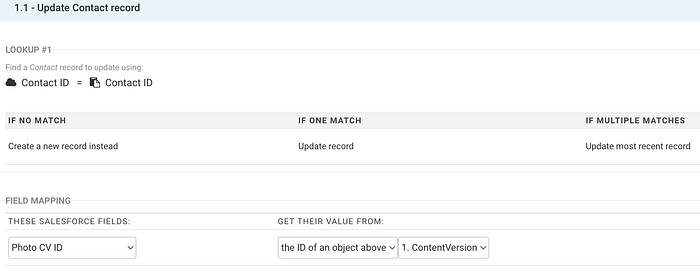
(4b) Update the Contact Record to store the ContentVersion ID
Look up the Contact ID in whatever way you normally do. For this example we are just using the hidden field we would have pre-populated via the URL.
Set your Photo CV ID field you created in step 1 to “the ID of an object above” so that it is 1. ContentVersion.
(Step 5) Save your form and test it all out
Upload a file to your FormAssembly form, and you should get:
- A File attached to the Contact record for which you provided the prefilled ID
- A value in the Photo CV ID field
- A 200x200 view of your file in your rich text Photo field

Congratulations! You’ve just upload a file and put it into a rich text field! Have fun!
My firm (Deep Why Design) specializes in weird use cases and things nobody else wants to touch — from big and innovative shared platforms and custom solutions to teaching accidental admins how to get the most out of their systems. My areas of expertise are fire jumping and forensics — call when there’s an unsolvable problem — and the design and management of large, integrated, and complex data systems in highly constrained situations.